
지난 포스팅에 이어서,
구글 연동을 해두었으니 이제 사용자 페이지에서 직접 맛집을 추가하고 삭제해보자.
1. Apps Script 수정
우선 지난 구글시트의 Apps Script 다시 가서 Code.gs에 아래 내용을 추가한다.
function doPost(e) {
  const sheet = SpreadsheetApp.getActiveSpreadsheet().getSheetByName("restaurants");

  const data = JSON.parse(e.postData.contents);

  // 삭제
  if (data.action === "delete") {
    const rows = sheet.getDataRange().getValues();

    for (let i = 1; i < rows.length; i++) {
      if (rows[i][0] == data.id) { // id 비교
        sheet.deleteRow(i + 1);
        break;
      }
    }

    return ContentService
      .createTextOutput(JSON.stringify({ result: "deleted" }))
      .setMimeType(ContentService.MimeType.JSON);
  }

  // 추가
  sheet.appendRow([
    data.id,
    data.name,
    data.category,
    data.price,
    data.comment,
    data.createdAt,
    data.createdBy
  ]);

  return ContentService
    .createTextOutput(JSON.stringify({ result: "success" }))
    .setMimeType(ContentService.MimeType.JSON);
}
"restaurants" 시트에서,
action이 "delete"일 경우 행의 첫번째 값(=id값)이 일치하는 데이터를 삭제하고
아니면 데이터(id,name,category,price,comment,createdAt,createdBy)를 추가하겠다는 뜻이다.
저장하고 오른쪽 상단 배포를 클릭한다.
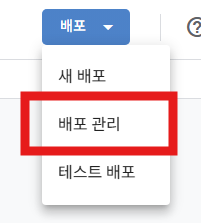
이번에는 새배포가 아닌 배포 관리로 들어간다.
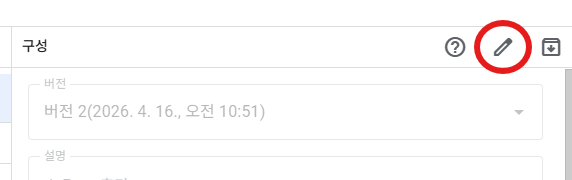
배포 관리 창에서 수정 버튼을 클릭한다.

버전 셀렉트박스가 활성화 되는데, 여기서 새 버전 클릭
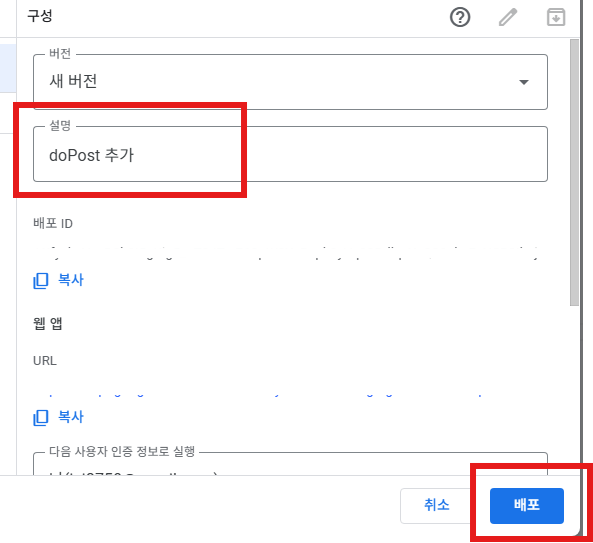
설명을 입력하고 배포 클릭.
Apps Script를 수정할 경우, 반드시 새 버전으로 배포를 해줘야 변경사항이 반영된다.
이렇게 하면 구글시트에서 데이터를 받을 준비가 끝났다.
2-1. 프론트 수정 (맛집 추가 영역)
이제 사용자 페이지를 수정해보자.
index.html을 수정해본다. 맛집 추가할수 있는 영역을 추가했다.
위치는 랜덤추천 아래, 맛집리스트 윗쪽으로 잡았다.
<section class="panel add-panel">
      <details class="add-accordion" open>
        <summary class="add-accordion__summary">
          <div class="section-title-wrap summary-title">
            <div>
              <h2>맛집 추가</h2>
              <p>간단하게 맛집을 등록해보세요!</p>
            </div>
            <span class="accordion-hint">눌러서 펼치기</span>
          </div>
        </summary>

        <div class="add-accordion__content">
          <form id="addRestaurantForm" class="add-form">
            <div class="form-grid">
              <div class="form-group">
                <label for="nameInput">가게 이름 *</label>
                <input
                  type="text"
                  id="nameInput"
                  placeholder="예: 김밥천국"
                  required
                />
              </div>

              <div class="form-group">
                <label for="categoryInput">카테고리 *</label>
                <select id="categoryInput" required>
                  <option value="">카테고리 선택</option>
                  <option value="korean">한식</option>
                  <option value="bunsik">분식</option>
                  <option value="japanese">일식</option>
                  <option value="western">양식</option>
                  <option value="cafe">카페</option>
                </select>
              </div>

              <div class="form-group">
                <label for="priceInput">가격</label>
                <input type="text" id="priceInput" placeholder="예: 8000" />
              </div>

              <div class="form-group">
                <label for="createdByInput">등록자</label>
                <input
                  type="text"
                  id="createdByInput"
                  placeholder="예: 홍길동"
                />
              </div>

              <div class="form-group full-width">
                <label for="commentInput">한줄 설명</label>
                <input
                  type="text"
                  id="commentInput"
                  placeholder="예: 빠르게 한끼 해결"
                />
              </div>
            </div>

            <div class="form-actions">
              <button type="submit" class="primary-btn">맛집 추가하기</button>
            </div>
          </form>
        </div>
      </details>
    </section>
style.css도 추가
/* 전체 패널 */
.add-panel {
  margin-bottom: 25px;
}

/* 아코디언 */
.add-accordion {
  background: #fff;
  border-radius: 14px;
  box-shadow: 0 4px 12px rgba(0,0,0,0.08);
  overflow: hidden;
}

/* summary */
.add-accordion__summary {
  cursor: pointer;
  list-style: none;
  padding: 18px 20px;
}

/* 기본 화살표 제거 */
.add-accordion__summary::-webkit-details-marker {
  display: none;
}

/* 타이틀 영역 */
.summary-title {
  display: flex;
  justify-content: space-between;
  align-items: center;
}

.summary-title h2 {
  margin: 0;
  font-size: 18px;
}

.summary-title p {
  margin: 4px 0 0;
  font-size: 13px;
  color: #777;
}

/* 힌트 */
.accordion-hint {
  font-size: 12px;
  color: #aaa;
}

/* 펼쳐진 영역 */
.add-accordion__content {
  border-top: 1px solid #eee;
  padding: 20px;
}

/* 폼 */
.add-form {
  width: 100%;
}

/* grid */
.form-grid {
  display: grid;
  grid-template-columns: repeat(2, 1fr);
  gap: 15px;
}

/* 전체 width */
.full-width {
  grid-column: span 2;
}

/* 입력 그룹 */
.form-group {
  display: flex;
  flex-direction: column;
}

/* 라벨 */
.form-group label {
  font-size: 13px;
  margin-bottom: 5px;
  color: #555;
}

/* input / select */
.form-group input,
.form-group select {
  padding: 10px;
  border-radius: 8px;
  border: 1px solid #ddd;
  font-size: 14px;
  transition: 0.2s;
}

.form-group input:focus,
.form-group select:focus {
  border-color: #4dabf7;
  outline: none;
}

/* 버튼 영역 */
.form-actions {
  margin-top: 20px;
  text-align: right;
}

/* 버튼 */
.primary-btn {
  padding: 10px 18px;
  border-radius: 10px;
  border: none;
  background: #4dabf7;
  color: white;
  font-weight: bold;
  cursor: pointer;
  transition: 0.2s;
}

.primary-btn:hover {
  background: #339af0;
}
script.js도 등록하는 함수를 추가한다.
document
  .getElementById("addRestaurantForm")
  .addEventListener("submit", async function (e) {
    e.preventDefault();

    const data = {
      id: Date.now().toString(),
      name: document.getElementById("nameInput").value,
      category: document.getElementById("categoryInput").value,
      price: document.getElementById("priceInput").value || "0",
      comment: document.getElementById("commentInput").value,
      createdAt: new Date().toISOString(),
      createdBy: document.getElementById("createdByInput").value || "익명",
    };

    try {
      await fetch(API_URL, {
        method: "POST",
        body: JSON.stringify(data),
      });

      alert("등록 완료!");

      this.reset(); // 폼 초기화
      renderList(); // 리스트 다시 불러오기
    } catch (err) {
      console.error(err);
      alert("등록 실패 😢");
    }
  });
여기까지 하면 맛집 등록까지 문제없이 진행된다.
2-2. 프론트 수정 (카드에 삭제버튼 추가)
기존에 뿌려주던 카드 리스트에 삭제 버튼을 추가한다.
맛집 리스트는 script.js에서 뿌려주고 있으므로 script.js의 renderList() 함수를 다음과 같이 수정한다.
async function renderList() {
  const loading = document.getElementById("loading");
  const container = document.getElementById("cardList");

  // 로딩 보여주기
  loading.style.display = "block";
  container.innerHTML = "";

  const restaurants = await fetchData();

  // 로딩 숨기기
  loading.style.display = "none";

  restaurants.forEach((item) => {
    const card = document.createElement("div");
    card.className = "card";
    card.classList.add(item.category);

    card.innerHTML = `
  <div class="title">${item.name}</div>
  <div class="category">${categoryLabel[item.category] || item.category}</div>
  <div class="desc">${item.comment || ""}</div>
  <div class="price">${item.price ? item.price + "원" : ""}</div>

  <button class="delete-btn" onclick="deleteItem('${item.id}')">
    삭제
  </button>
`;
    container.appendChild(card);
  });
}
기존에 포함되지 않았던 가격 부분과 삭제 버튼을 추가했다.
삭제 버튼에 사용되는 deleteItem함수는 다음과 같이 작성한다. 해당 카드의 id값을 받아서 삭제한다.
async function deleteItem(id) {
  if (!confirm("삭제하시겠습니까?")) return;

  try {
    await fetch(API_URL, {
      method: "POST",
      body: JSON.stringify({
        action: "delete",
        id: id,
      }),
    });

    alert("삭제 완료!");
    renderList();
  } catch (err) {
    console.error(err);
    alert("삭제 실패 😢");
  }
}
fetch할때 headers를 넣었더니 Apps Script 가 못받아서 뺐다. Apps Script fetch 할때는 headers 빼기!
삭제버튼과 가격부분 css도 추가
.delete-btn {
  margin-top: 10px;
  padding: 6px 10px;
  font-size: 12px;
  border: none;
  border-radius: 6px;
  background: #ff6b6b;
  color: white;
  cursor: pointer;
}

.delete-btn:hover {
  background: #fa5252;
}

.price {
  font-size: 13px;
  font-weight: bold;
  color: #ff6b6b;
  background: #fff5f5;
  padding: 4px 8px;
  border-radius: 6px;
}

/* 카드 제목 css 추가 */
.card-header {
  display: flex;
  justify-content: space-between;
  align-items: center;
}
여기까지 하면 이제 사용자 페이지에서 맛집을 직접 추가하고 삭제할수 있다.
수정은 시간관계상 다음 포스팅으로 ㅠㅠ
추후 포스팅할 추가사항 :
- 맛집 정보 사용자단에서 수정 하기
- 리뷰 시스템 (별점, 한줄평)
- 필터링 (카테고리, 키워드 검색 등)
'개발 > 이것저것' 카테고리의 다른 글
| [JavaScript] 나만 쓰는 맛집 리스트 만들기 (카드 UI 구현) - 5. 필터링 구현 (0) | 2026.04.19 |
|---|---|
| [JavaScript] 나만 쓰는 맛집 리스트 만들기 (카드 UI 구현) - 4. 구글 시트 UPDATE (1) | 2026.04.18 |
| [JavaScript] 나만 쓰는 맛집 리스트 만들기 (카드 UI 구현) - 2. 구글 시트 연동하기 (1) | 2026.04.16 |
| [JavaScript] 나만 쓰는 맛집 리스트 만들기 (카드 UI 구현) - 1. 기본 레이아웃 (0) | 2026.04.15 |
| 무료로 PDF파일 합치기 : 개발 몰라도 OK, 개인정보 걱정 없이 파이썬을 활용한 초간단 방법 (2) | 2025.07.03 |


